Understanding Squeegee Durometer for Smooth Prints
Posted by Art Supplies Castlemaine on 11th Oct 2026
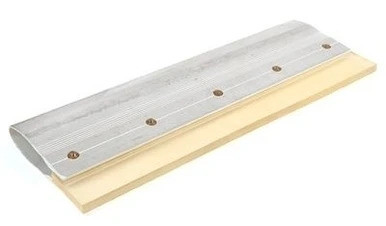
Getting a clean, consistent print during a screen printing session often comes down to having the right tools. While most people focus on ink type or mesh size, there is another part that plays a major role in how ink moves across your screen, the squeegee blade itself.
The softness or hardness of a squeegee, called its durometer, can change how your ink flows, how sharp your detail looks, and how many passes you need to get the coverage you want. Whether you are printing a bold poster or a detailed textile design, matching the blade to your job makes a big difference.
That is why we always talk to artists about how durometer fits in with the rest of their screen printing supplies. It is not just background gear, it is a hands-on tool that affects every layer you lay down.
What Is Squeegee Durometer and Why It Matters
Durometer just means hardness. When we talk about a squeegee’s durometer, we are talking about how soft or firm the rubber blade is. The lower the number, the softer the blade feels. Higher numbers mean stiffer, firmer rubber that does not bend much under pressure.
The scale runs on numbers like 60, 70, or 80, which are common for printmaking. It is not a guess, these numbers help you figure out how the blade will behave while you work.
Here is what durometer affects in practice:
- How much ink gets pushed through the screen
- How easily the squeegee bends as you pull it across
- Whether your lines end up crisp or slightly soft
A softer blade might seem forgiving, but if you are trying to keep tight edges, it might deposit too much ink. A firm blade offers control but might skip thinner areas or warp on uneven surfaces.
Comparing Soft, Medium, and Hard Squeegees
We often start by asking what kind of look or feel you want from your print. A soft blade (around 60 durometer) will flex more, spread more ink, and work well on textured surfaces or for heavy fills. These tend to be used when coverage matters over fine detail.
Medium blades, usually around 70 durometer, are common for multi-purpose use. They give you solid handling and balanced ink flow across different screens and styles. If you are trying to keep tight shapes without flooding the design, this type keeps control without being too firm.
A hard blade, about 80 durometer, feels stiff from the beginning. These are often used for fine details or printing on slick, nonporous surfaces where a soft blade might slide too much. They help keep lines clean and thin, which is helpful if you are printing text or detailed artwork.
The feel of the blade in your hand is a good guide. If it bends too easily when you are applying medium pressure, you are likely holding a soft one. If it holds its shape without giving much, it is probably a firmer type.
How Durometer Affects Ink Flow and Print Detail
Different durometer levels create different effects on your print. That is because the amount of bend in the blade changes how the ink flows through the mesh.
Here is what each level tends to offer:
- Soft squeegees lay down more ink and fill open areas faster
- Medium squeegees give even coverage and less ink bleed, helpful for layering
- Hard squeegees offer tighter lines and more control with smaller details
If you are working with detailed linework or delicate halftone patterns, a hard blade will be easier to manage. Bold poster designs or large colour areas might feel better with a medium or soft blade.
Surface texture also matters. Soft blades follow rough or uneven paper better, while stiff blades hold their angle on flatter work. Understanding how your surface reacts with each durometer helps avoid excess ink pooling or uneven shapes.
When to Switch It Up: Matching Durometer to Project
Not every job should be handled with the same blade. We often change blades based on size, fabric, or design detail. That is especially true if we are working across paper types or using different inks.
Here are typical matchups that might help:
- Soft squeegees (60) for bold poster prints or heavier coats of ink
- Medium squeegees (70) for everyday use, such as art prints or apparel with solid blocks of colour
- Hard squeegees (80) for printing fine line work, halftones, or text
Design size plays into this too. Bigger prints often work better with softer blades that can flood larger spaces. For tight or small prints, hard squeegees limit ink flow so those details do not get lost.
Even the temperature in your work area can make a difference. Softer blades might get even softer in warm conditions and lose edge control. If you are working in a bright or heated studio, checking how your tools respond over time can help you adjust early.
Storing and Replacing Squeegees for Consistent Results
We have noticed that some prints change over time, not because of the design, but because the tools have worn out. Rubber blades soften, edge shapes shift, or one side wears out faster than the other. This is an easy fix once you know what to watch for.
A few ways to keep your blades ready:
- Store them flat, away from heat or sunlight
- Avoid stacking heavy objects on them, which can warp the edge
- Flip and rotate blades between sessions so one side does not wear faster
Blade edges should stay smooth and even. If you notice your print pulling at certain points, leaving trails, or acting like the ink is dragging, check your squeegee edge for nicks or loss of shape. A dull or frayed edge will not give consistent lines no matter the durometer.
Changing blades might seem like a small thing, but it keeps your prints looking sharp. Keeping spares in your kit is a handy way to stay prepared mid-session, especially during busier studio time in October when pre-holiday projects ramp up.
Getting the Right Feel for Your Print Style
Squeegee durometer affects more than just how your ink lands. It shapes each stage of the printing process, from pressure and angle to clean-up and layering. Choosing the right firmness helps us control our outcomes with less back-and-forth.
Every artist has their own preferences. Some switch between blades during a run, while others stick with one type that suits their drawing style. If you are still testing what works best, starting with a mid-range durometer and watching how the ink behaves can guide your next steps.
The real value comes from matching the tool with your rhythm. The right combination of mesh, ink type, and blade firmness removes some of the guesswork and lets your screen printing supplies do what they are meant to, support the work you are trying to make.
We have found that once artists know how to read what their materials are doing, their prints become smoother, sharper, and more predictable.
Whether you are testing out textures, switching up inks, or adjusting pressure, having quality tools makes each step smoother and more consistent. Our printmaking section includes a carefully selected range of tools and materials to support artists working across different styles and surfaces. When refining your studio setup or seeking a better feel on press, take a look at our current range of screen printing supplies. At Art Supplies Castlemaine, we are always happy to chat about what works best for your next print run so give us a ring or send us a message if you would like to talk it through.