Guide to Choosing Printmaking Equipment for Home Studios
Posted by Art Supplies Castlemaine on 24th Jul 2026
Working with printmaking equipment at home can feel both exciting and manageable when you’ve got a setup that suits your space. Whether you’re experimenting with linocuts or trying drypoint for the first time, having the right kit makes the process smoother and helps your prints come out consistent.
Home studios vary. Some of us are using the corner of a sunroom, others might take over the kitchen table. That’s why picking equipment that fits your space, habits, and the way you want to print matters more than just choosing the biggest or most advanced tools. There are lots of different methods available, along with a wide range of materials and surfaces to try. Getting familiar with your needs early makes it easier to build a setup that works without turning your living space upside down.
Choosing a Technique That Fits Your Space
Before buying anything, it helps to decide what type of printmaking you want to do. Some printmaking methods need more room or special tools, while others work well in smaller home settings.
Here are a few approaches to consider:
- Linocut is a good choice for home use. All you need is a lino block, a roller (brayer), some carving tools, and a flat surface. It doesn’t take up much space and clean-up is straightforward.
- Drypoint works well in smaller setups too. It uses plates (often acrylic or metal) and doesn’t usually require hazardous chemicals.
- Monoprinting gives freedom to experiment on paper without investing in a press straight away. It can be done with hand pressure or barens, using a range of textures and drawing tools.
Methods like screen printing or etching often need more equipment or good ventilation, which isn’t always easy to manage at home. Choosing something simpler at the start keeps things enjoyable and lets you focus on technique before worrying about upgrades.
Must-Have Tools for Starting Out
Once you’ve picked a method, getting reliable printmaking equipment becomes the next step. A basic home setup doesn’t have to include a press right away. There are a few pieces that can give you quality results without needing a lot of space.
Most artists start with these:
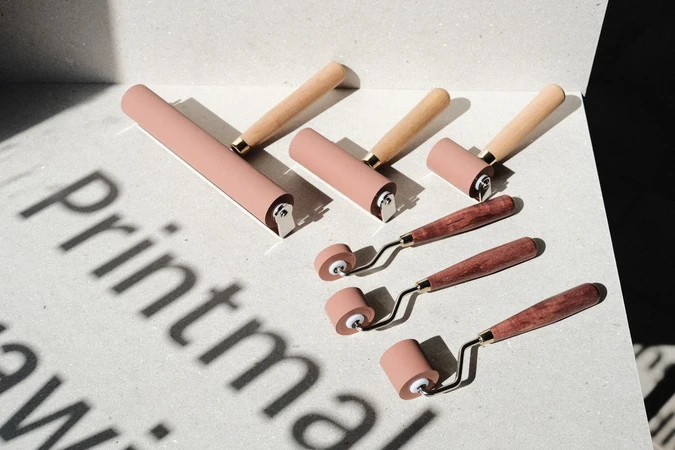
- A brayer (or roller) suited to your chosen ink and surface
- A plate that matches your method of printing, like a lino block or acrylic sheet
- A baren, wooden spoon, or other tool to apply pressure by hand
Some people go for full kits, especially at the beginning, while others prefer to buy bits separately. Kits are handy if you're not sure where to begin and want to get printing with minimal fuss. If you’ve already got a few supplies on hand, topping them up as needed might give you more control over what fits your space. For example, we stock Essdee Lino and SoftCut blocks in several sizes, plus basic and deluxe linocut sets that combine carving tools, rollers, and blocks so you can start experimenting without having to source each item individually.
If you’re working indoors, be mindful of fumes. Water-washable inks or low-odour options are a better fit for shared or closed-off rooms, especially in winter when you’re less likely to open a window.
Paper, Inks, and Storage Tips
Finding the right paper can completely change how your prints come out. Every printing method has a paper type that works best, and not all paper reacts the same once ink is applied.
Here’s what to look out for:
- Smooth paper often works well for fine lines or drypoint prints, letting detail show through clearly
- Textured papers can add interest for lino or block printing, especially when working with bold designs
- Heavier weight paper tends to hold up better when more ink or pressure is needed
Absorbency matters too. Softer papers soak up ink quickly, while coated paper might take longer to dry or spread unevenly. Water-based inks can dry faster in warm rooms but may act differently when the air is cooler or there’s moisture around.
Winter in Central Victoria brings damp air and cool mornings, so it’s smart to store your paper flat and well-covered. Inks should be kept sealed tightly and not left sitting open for too long. Direct sunlight and cold corners can affect texture, making even good-quality supplies harder to work with next time. Our printmaking range includes cartridge sheets, Magnani Pescia and Stonehenge papers, and Fabriano Rosaspina in various weights so you can choose between 100 percent cotton or cotton–cellulose blends that stand up well to home press or hand-burnished printing.
Setting Up a Comfortable Work Area
A home studio doesn’t need to be large, but it does need to work with how you move and store things. Picking the right surface and keeping your tools organised helps you get straight into your session without wasting time.
A few ways to set up your space for better flow:
- Use a washable surface like a glass table top, plastic sheet, or panel that can handle ink spills
- Make the most of natural daylight when available, or add a lamp with consistent task lighting
- Keep clean paper and used sheets separate to avoid smudging or transferring ink
In small spaces, shelves, stackable boxes, or a trolley can help keep materials within reach but off your printing surface. Air movement matters if you’re using any solvent, so work near a window or door when possible. For shared houses or flats, try using a damp towel under your tools to stop noise and reduce vibration during carving or pressing.
Clean-up is part of the rhythm and worth planning for too. Having wipes, cloths, or buckets nearby keeps your process smoother at the end as well as the beginning.
When to Swap or Upgrade Equipment
The tools you start with will probably change over time. As materials wear down or techniques shift, it helps to know when to replace something or bring in a new piece of gear.
Some signs it’s time for a change:
- Your brayer is getting stiff, uneven, or leaves streaks
- You’re printing more often and the hand pressure method feels inconsistent or tiring
- Your paper sheds, lifts, or won’t hold fine detail anymore
Small changes like switching to a sturdier baren or using higher-quality paper can give you better printing results without needing a full setup overhaul. When prints start feeling harder to control or less clean than you expect, it’s usually the materials asking for a refresh.
We tend to build our studio kit gradually. There’s no rush to replace everything at once. Start with one upgrade and see how it changes your work, then go from there.
Building a Setup That Grows With You
Good habits around printmaking equipment can lead to steady improvements, both in your prints and how confident you feel working with your space. The best setups come from paying attention to what works well and what still feels clunky.
Small choices stack up. Switching to better paper, finding the right roller size, or carving at a better height makes your experience smoother and more satisfying. You don’t need the biggest gear or complete sets to get results that feel strong and expressive.
As practice builds, your materials and setup can shift bit by bit without it becoming a big project. That flexibility means your home studio can change with you, whether you’re printing weekly or once a season. Along the way, you might choose to add an etching press, bench hook, or extra rollers to speed up editions once you know which techniques you return to most often.
Building out your home studio or shifting to new methods means choosing tools that suit your space and approach. We have put a lot of thought into curating reliable options for everything from surface prep to carving and inking. Whether you’re developing cleaner impressions or upgrading paper quality, having the right printmaking equipment makes a difference you can feel in your workflow. At Art Supplies Castlemaine, we’re happy to help you fine-tune your setup, so get in touch with us to chat about what you need.